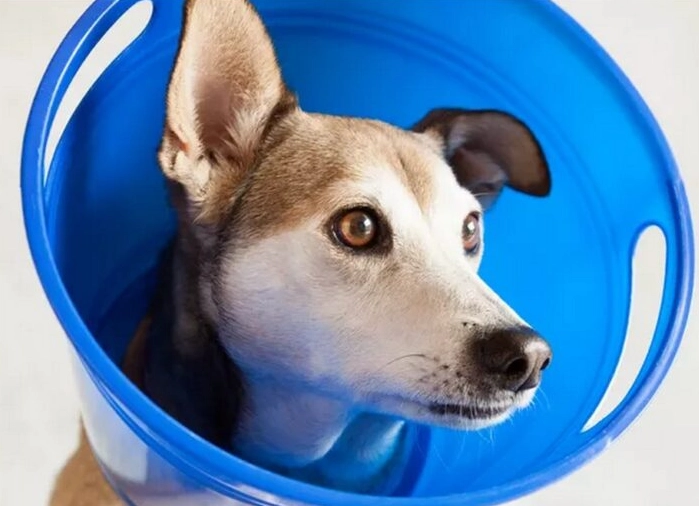
Let’s be honest. The dog neck cone, or Elizabethan collar, is one of those necessary evils of pet ownership. Your vet hands it to you after surgery, you put it on your confused pup, and suddenly your graceful Labrador turns into a walking satellite dish that bumps into every doorframe. It’s frustrating for them, and honestly, a bit heartbreaking for you. But here’s the thing most new pet owners miss: that cone isn’t just a nuisance. It’s a critical medical device. Getting it wrong can mean a delayed recovery, a nasty infection, or another costly vet visit.
I’ve been through this with my own dogs more times than I’d like—spays, lump removals, a nasty paw injury. I’ve made every mistake in the book, from using the wrong type to taking it off too soon. This guide isn’t just a list of facts. It’s the hard-won advice I wish I’d had, covering not just the "what" but the "how" and "why," including some alternatives that might save your sanity.
What’s Inside This Guide?
- Why Your Dog Needs a Cone (And When to Skip It)
- Choosing the Right Cone: A Material and Style Breakdown
- The 3-Step Guide to Fitting a Dog Neck Cone Properly
- Life with the Cone: Practical Tips for Pet and Parent
- Beyond the Cone: Effective Alternatives You Should Consider
- Dog Neck Cone FAQs: Expert Answers to Your Top Questions
Why Your Dog Needs a Cone (And When to Skip It)
The primary job of an e-collar is simple: to prevent licking, biting, or scratching at a wound. A dog’s tongue is rough, and their mouths are full of bacteria. What seems like a gentle lick can re-open stitches, introduce infection, and turn a simple recovery into a major setback. The American Veterinary Medical Association (AVMA) emphasizes post-operative care to prevent complications, and proper confinement—which includes barrier devices like cones—is a cornerstone of that.
But a cone isn't always the answer. I learned this the hard way with my anxious terrier. The rigid plastic cone amplified his stress to the point where he’d freeze and shake. For some dogs, the psychological distress can outweigh the physical risk, especially for wounds in hard-to-reach places. The key is to match the protection to the dog and the injury. If the cone causes panic that leads to injury (like frantic attempts to escape), an alternative is not just nice, it’s necessary.
Choosing the Right Cone: A Material and Style Breakdown
Walking down the pet aisle, you’ll see more than just the classic plastic lamp shade. Picking one isn't about the cutest pattern. It’s about material, rigidity, and your dog’s specific injury site. Here’s a breakdown I’ve found useful.
| Material/Type | Best For | Pros | Cons & Expert Notes |
|---|---|---|---|
| Traditional Hard Plastic | Post-surgery (spay/neuter, major incisions), determined chewers. | Maximum protection, durable, easy to clean, inexpensive. | Restricts peripheral vision, noisy, can be stressful. Pro Tip: Look for ones with padded edges to reduce neck chafing. |
| Soft Fabric/ Flexible Plastic | Less invasive procedures, dogs sensitive to noise and rigidity. | More comfortable, quieter, often foldable for easier eating/drinking. | Less rigid, so a persistent dog might bend it to reach a wound. Not for powerful chewers. |
| Inflatable Collar (Neck Doughnut) | Chest, torso, or leg wounds. Not ideal for paw or hindquarter injuries. | Allows normal vision and hearing, less stressful, doubles as a travel pillow. | Zero protection if the wound is behind the collar (like on a back paw). Can deflate if punctured. |
| Recovery Suit/Bodysuit | Body incisions (spay, mass removal), dogs who utterly reject any neck device. | Full-body coverage, very comfortable, reduces stress dramatically. | Must be removed for bathroom breaks, can get soiled, may not stop licking at seams. |
My go-to for a standard spay is still a soft fabric cone. It offers a good balance. But for my dog’s paw surgery, only a full plastic cone worked—the inflatable one was useless because he could just bend his neck down.
The 3-Step Guide to Fitting a Dog Neck Cone Properly
A poorly fitted cone is the number one reason dogs hate them. Too tight, it chokes. Too loose, they can paw it off or, worse, get a leg stuck in it.
Step 1: Measure the Neck, Not the Collar
Use a soft tape measure around the base of your dog’s neck where their collar sits. Add about two inches to this measurement. This is the minimum inner diameter of the cone’s neck opening. Don’t guess. I did once, and the cone was so tight it rubbed a raw spot in a day.
Step 2: Check the Length
This is critical. With the cone loosely in place, the front edge should extend at least two inches past the tip of your dog’s nose. Have them sit naturally. Can they touch their nose to their knee or paw? If yes, it’s too short. They’ll reach the wound.
Step 3: Secure and Observe
Attach it to a well-fitted collar, not directly to the neck. You should be able to comfortably slide two fingers between the cone strap and your dog’s neck. Then, watch. Don’t just leave them. Observe for 30 minutes. Can they drink water? (Raise the bowl). Can they navigate a doorway without getting stuck? This initial supervision prevents panic.
Life with the Cone: Practical Tips for Pet and Parent
The first 24-48 hours are the hardest. Your dog is confused and possibly still groggy from anesthesia. Your goal is to make the cone a neutral, and maybe even positive, part of their life.
Home Modifications are Non-Negotiable. Clear a path. Move fragile items off low tables. Consider using baby gates to block off cluttered rooms or narrow hallways. The constant *thump-thump-thump* against walls is stressful for everyone.
Feeding and Drinking. Elevate food and water bowls. Use a raised stand or place bowls on a low platform. A shallow, wide bowl works better than a deep one. For the first few meals, hand-feeding a bit of kibble through the cone can create a positive association.
Mental Stimulation is Your Best Tool. A bored dog focuses on the cone. A mentally tired dog sleeps.
- Use puzzle toys stuffed with their favorite food.
- Practice simple, stationary commands like "watch me" or "leave it" for treats.
- Short, leashed walks for mental sniffs (if vet-approved).
It’s heartbreaking. You’ll want to take it off. But consistency is kindness. The faster they adapt, the easier the recovery.
Beyond the Cone: Effective Alternatives You Should Consider
If the traditional cone is a disaster for your dog, don’t despair. Modern alternatives can be just as effective when matched correctly to the injury.
The Inflatable Collar (Donut): Perfect for my friend’s dog after chest surgery. The dog could sleep comfortably and see everything. But when she tried it for her dog’s tail wound? Complete failure. The dog just looked down. Match the protection to the geography of the wound.
Recovery Suits: These are game-changers for body wounds. They’re like little pajamas with a protective panel. My only gripe? You have to unsnap the rear for potty breaks, which can be messy. Get two so you have a spare when one is in the wash.
Soft Neck Braces: These limit neck flexibility without the bulk of a cone. They’re niche but brilliant for neck or shoulder injuries where you need to prevent twisting, not necessarily full-range mouth access.
Always, and I mean always, run any alternative by your vet before switching. Show them a picture or the product page. They need to confirm it will provide adequate protection for your dog’s specific procedure.
Dog Neck Cone FAQs: Expert Answers to Your Top Questions
How long should my dog wear a cone after surgery?
Most vets recommend a minimum of 10-14 days, or until the sutures are removed and the wound is fully closed. The critical period is the first 7-10 days when healing is most fragile. Never remove it early just because your dog seems fine; licking can cause infection or reopen the wound in seconds. I keep it on for the full two weeks, no exceptions.
Are there any effective alternatives to the traditional plastic cone?
Yes, but with major caveats. Inflatable collars are great for chest or leg wounds but can fail for paw lickers. Soft fabric cones offer more comfort but less rigidity. Recovery suits are excellent for body incisions like a spay. The choice isn't about what's cutest—it's about creating a physical barrier between your dog's mouth and the wound. The best option depends entirely on the location of the injury and your dog's determination level.
My dog keeps scratching around the cone. What can I do?
This usually means the cone is irritating their neck or they're trying to reach an itch they can't scratch. First, check for chafing and add soft padding (like moleskin) to the inner edge. For the itch, try a gentle brushing session with a long-handled brush you can maneuver around the cone. Sometimes, they're just frustrated. A 10-minute sniffari in the yard (on leash) can distract them enough to forget the itch.
Can I take the cone off if my dog is eating or sleeping?
You can, but only under direct, close supervision. For eating, stay in the room and watch. The moment they finish, the cone goes back on. For sleeping, it's riskier. A dog can wake and start licking before you notice. I only recommend supervised, brief removals for highly compliant dogs, and I always err on the side of caution. Most dogs learn to eat and sleep with the cone on within a couple of days—trust me, they adapt faster than we do.
The cone period is temporary. It’s a short chapter in your long life together. By choosing the right tool, fitting it well, and managing your home and their routine, you turn a stressful ordeal into a manageable blip. Focus on the end goal: a healthy, healed dog. The few weeks of hassle are worth it to avoid a weeks-long setback. You’ve got this.
Leave a comment